
In recent years, advancements in artificial intelligence have brought about impressive tools that simplify tasks which once demanded extensive manual labor and expertise. One such application is the use of AI models for background removal in images - a task that traditionally required attention to detail, often done manually with graphic design software. While AI offers significant efficiencies, each model comes with its own strengths and limitations, presenting new challenges and considerations. This article explores these challenges, showcases examples, and demonstrates how combining multiple AI models can yield results that are both more accurate and flexible.
A video is also available for this article, showcasing the processes described.
The Challenge of Imperfect Background Removal with AI
Background removal may seem straightforward, but it often involves complex decisions, such as differentiating between objects and their backgrounds based on color, shape, and texture. AI models use training data to make these decisions, but no single model is perfect for all scenarios. A model that performs well on one type of image may fail on another due to variations in background complexity, lighting, or object color. Therefore, when using a single model, imperfections are almost inevitable. This could manifest as either a part of the object being erroneously removed or the background not being entirely erased, leaving unwanted remnants.
Many professionals who work with these tools know how frustrating it can be to spend hours fine-tuning an AI model’s settings or manually correcting small errors, only to find that the results are still not up to par. Fortunately, combining multiple AI models can offer a solution.
Case Study 1: Combining Models for Optimal Results
To illustrate the benefits of combining models, let’s explore a specific example where each model, when used alone, falls short. In this example, we have two AI models, each with unique strengths and weaknesses:
-
Model 1 is proficient at removing backgrounds but occasionally removes parts of the object if it shares a similar color with the background. This can be problematic when the object of interest is not well-delineated from the background, as the model may interpret sections of the object as part of the background and erase them.
-
Model 2, on the other hand, tends to leave slight edges or shades around the subject, even though it effectively removes most of the background. While it preserves the main object better than Model 1, these residual edges often require manual post-processing.
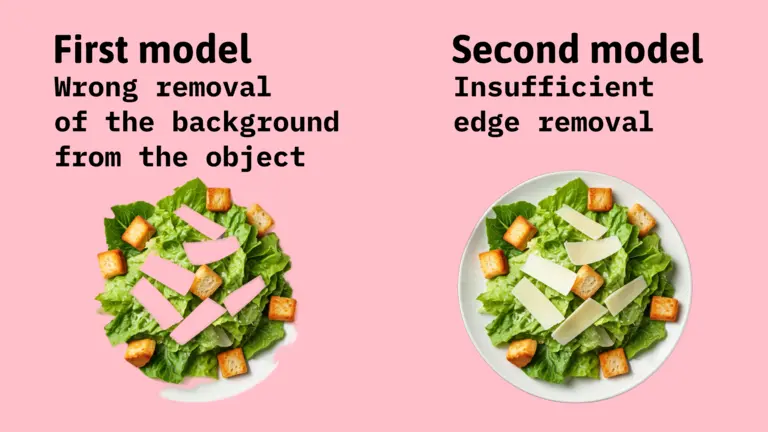
By combining these models in sequence, we can overcome their individual limitations. In this example, we use Model 2 as the initial layer of processing, allowing it to remove most of the background while leaving a small edge around the subject. This step ensures that the object remains mostly intact, even if it shares colors with the background. Next, we apply Model 1 to refine the edges, removing the remaining unwanted background and creating a cleaner, more accurate result.
This two-step approach effectively compensates for the shortcomings of each model, delivering a refined image that neither model could produce on its own. This example illustrates how a hybrid approach can reduce manual intervention and produce a polished result more efficiently.

Image Choice: The Key to Successful Background Removal
The effectiveness of a background removal model doesn’t just depend on the AI - it also depends on the characteristics of the input image. Images with high contrast between the subject and the background generally yield better results with single-model processing, as the AI can more easily differentiate between the two. However, real-world images are rarely this straightforward. An object may have colors or textures that are too similar to the background, causing even the best models to struggle with segmentation.
Interestingly, a result that appears unsatisfactory for one purpose may be exactly what is needed for another. For example, leaving a slight edge around a subject may be undesirable for certain professional contexts, but it could work well for marketing materials where the subject stands against a similar-colored background. Likewise, a model that removes parts of the object can be useful in cases where a silhouette or a partially masked effect is desired.
This variability emphasizes the importance of carefully selecting images based on the intended outcome and choosing models or combinations accordingly. In cases where achieving precision is a priority, using multiple models becomes essential to refining the output to the highest possible quality.
Case Study 2: Tailoring AI Models to Specific Requirements
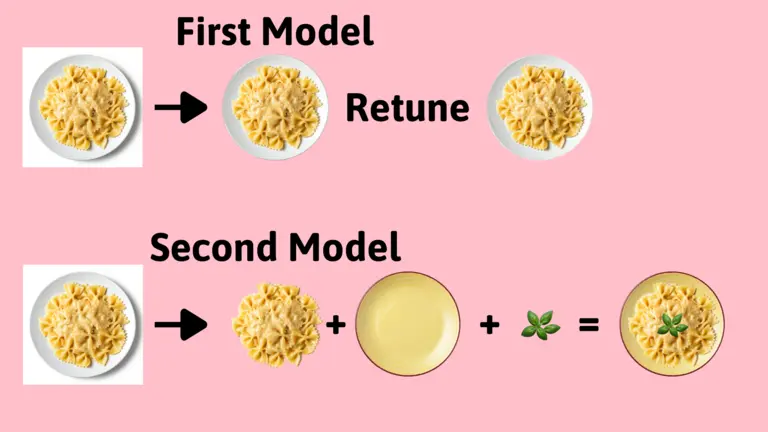
Another practical example highlights the need for flexibility in background removal. Suppose we have an image with an object that shares colors with the background, but in this case, we actually want to remove this object entirely. The first AI model successfully retains the object, assuming it to be part of the primary subject. While this may be useful in some situations, it contradicts our specific requirement in this scenario.
To achieve the desired result, we turn to another model that is better suited to identifying and removing the object completely. This process allows us to eliminate the unnecessary object while preserving the quality and accuracy of the image. This example underscores the adaptability of AI - using multiple models, we can achieve vastly different outcomes based on our needs without being restricted to a single interpretation of the scene.
The Synergy of Combining AI Models
The combined use of multiple AI models in image processing unlocks new potential for more nuanced and reliable results. While individual models may fall short in certain respects, their combination can address complex segmentation issues that would otherwise require intensive manual correction.
Here are some advantages of this approach:
-
Increased Accuracy: By layering models with different strengths, it’s possible to address edge cases that would be challenging for any single model, resulting in a more precise background removal.
-
Reduced Manual Intervention: With the appropriate model combinations, the need for tedious manual adjustments decreases significantly, saving time and effort.
-
Customization for Specific Requirements: Different projects have different requirements. Some might need perfect isolation of the subject, while others might be looking for a more stylized result. Combining models offers the flexibility to tailor outputs based on unique project demands.
-
Enhanced Quality: The hybrid approach allows for high-quality outputs that can be used in professional environments where accuracy and clarity are important.
-
Improved Efficiency: For high-volume work, such as in e-commerce or media production, using model combinations can create consistent, high-quality results more efficiently than relying on a single model or manual methods.
Conclusion: Embracing the Power of AI Model Combinations
The field of image processing is a dynamic landscape, and AI has undoubtedly become a powerful tool within it. However, it’s essential to recognize that no single AI model can handle all types of background removal with perfect accuracy. By combining multiple AI models, we gain the ability to tailor our approach to each image’s unique characteristics and our specific goals. This synergy minimizes the weaknesses of individual models while amplifying their strengths, ultimately leading to cleaner, more reliable, and more versatile results.
As AI technology continues to evolve, we can expect even greater specialization among models, which will open new doors for creative and practical applications alike. In the meantime, the approach of combining models stands as a valuable strategy, empowering users to harness the full potential of AI in creating polished, professional images. Whether for design, marketing, or other industries, mastering this technique will be a crucial asset for anyone seeking to make the most out of AI-driven image processing.

If you're a seasoned WordPress user, you likely know your way around its intuitive interface, extensive plugin library, and theme system. However, at some point, you might have hit a wall with WordPress. Whether it’s performance, flexibility, or scaling issues. Perhaps you're looking for a Content Management System (CMS) that offers more control, robustness, and performance right out of the box. This is where Joomla comes in.
Joomla is an open-source CMS like WordPress, but it is built to deliver more power, scalability, and flexibility, without requiring as many hacks or workarounds. In this guide, we will dive into the key differences between Joomla and WordPress, highlighting the strengths of Joomla as a modern CMS that excels in performance, accessibility, best practices, SEO, and much more.
Joomla vs. WordPress: Understanding the Core Differences
WordPress and Joomla have different design philosophies, and understanding these differences is key to seeing why Joomla might be the better solution for your next project.
1. A Real System Built on Modern Code Architecture
WordPress is easy to use, and for many, it serves as a great tool for small to medium-sized websites or blogs. However, WordPress’s ease of use can sometimes come at the expense of flexibility. As you grow into larger, more complex sites, WordPress’s structure starts to feel limited, and many users resort to hacks or extensive plugins to meet their growing needs.
Joomla, on the other hand, is designed from the ground up as a true system, built on a robust and modular architecture. What does this mean for you?
- No need for hacks: Joomla provides many features as part of its core, which in WordPress would require plugins, custom code, or hacking the core files. Joomla's flexibility is built-in and not retrofitted.
- Strong Typing: Joomla features a well-typed extension system, where different types of functionality are clearly separated - ensuring that extensions (plugins, modules, and components) are cleanly integrated, reducing the chances of conflicts and making the system much more predictable.
Joomla is built on modern PHP and MVC architecture (Model-View-Controller), adhering to strict coding standards, which makes it future-proof and easy to maintain over time.
2. Template Overrides: Ultimate Customization Without Breaking the Core
One of Joomla’s most powerful features is its template override system. In WordPress, customizing the layout or design of a plugin or theme can often require you to modify the core files, which risks losing your changes during updates. This is one of the most frustrating aspects for developers.
With Joomla, template overrides allow you to completely customize the way any part of your site is displayed without touching the core files. This means:
- Full control over how your articles, modules, and components are displayed.
- Future-proof customizations that remain intact through updates.
- A clean and efficient way to implement custom designs or behaviors across your site.
This flexibility makes Joomla particularly appealing to developers and designers who want the freedom to craft custom layouts, but without the technical debt that can come from hacking core files.
3. Menu-Driven Architecture for Total Control Over Navigation and Links
WordPress menus are often seen as an afterthought. You create your pages and posts first, and then add them to your menu later. Joomla takes a fundamentally different approach - menus are the foundation of your site’s structure.
In Joomla:
- You create menu items to control the structure of your site. These menu items aren’t just links to pages; they can link to articles, categories, extensions, contact forms, blog views, or even external URLs.
- Each menu item can have its own individual settings, such as metadata, layout overrides, and more, giving you full control over how each section of your site behaves and is presented.
- This level of control makes Joomla much more powerful for large, complex sites with intricate navigation structures.
Additionally, Joomla’s use of relative URLs (for example image paths) ensures that when you move your site from a development environment (like localhost) to a live server, your links remain intact. This significantly simplifies site migration - a pain point for many WordPress users.
4. Modular Extensions: Plugins, Modules, and Components
In WordPress, everything is typically handled through plugins - whether you’re adding a widget, a custom post type, or even complex functionalities like a shopping cart. This approach, while simple, can result in bloated plugins that try to do everything.
Joomla adopts a more structured, modular approach:
- Plugins: Small pieces of code that extend functionality by responding to triggers (events). They are categorized (e.g., authentication, user, content, system) to provide clarity and reduce conflicts.
- Modules: Smaller content blocks that you can place anywhere in your template - similar to WordPress widgets, but far more flexible. Modules can display anything from custom HTML, lists of articles, banners, to specific user content.
- Components: These are like mini-applications that run in the background of Joomla to manage larger functions like e-commerce, blogs, and contact forms. Each component has its own administrator and public interfaces.
This clear separation of duties makes Joomla cleaner and more maintainable than WordPress, reducing the risk of plugin conflicts and performance degradation.
5. Performance and SEO: Optimized Out of the Box
WordPress users often rely heavily on third-party plugins like Yoast for SEO or WP Rocket for performance optimization. In contrast, Joomla includes many performance and SEO features out of the box, giving you better control from day one.
Some of Joomla’s built-in performance and SEO advantages include:
- Search Engine Friendly URLs (SEF URLs): Joomla creates clean, search-friendly URLs without needing a plugin.
- Metadata Control: You can easily manage page titles, descriptions, and keywords for each menu item or content piece.
- Built-in caching: Joomla includes both page and module caching to help reduce load times.
- GZIP compression: Enables server-side compression to minimize file sizes and speed up page load times.
- Optimized CSS and JS: Joomla can consolidate and compress CSS and JavaScript files to improve front-end performance.
These features help boost your site's visibility and speed without the need for additional plugins.
6. Advanced Access Control Levels (ACL)
For those running membership sites or needing granular control over user permissions, Joomla’s Access Control Level (ACL) system is a massive advantage.
While WordPress relies on roles and capabilities to manage user access, Joomla takes it several steps further with ACL:
- You can define custom user groups and assign highly specific permissions for different types of content and actions.
- ACL extends to components, modules, and even individual content items. This allows you to create intricate permission structures - ideal for sites with multiple contributors, private sections, or restricted areas.
This system makes Joomla highly suitable for enterprise-level websites, community platforms, or any site that requires detailed control over user permissions.
7. Multilingual Support: Native and Simple
WordPress requires third-party plugins like WPML or Polylang for multilingual support. In contrast, Joomla has multilingual capabilities built-in from the very beginning.
Joomla’s native multilingual system allows you to:
- Easily manage content in multiple languages.
- Set up language-specific menus and modules.
- Display language switchers to allow visitors to toggle between different languages.
Joomla’s multilingual support is robust and doesn’t require additional plugins, reducing the risk of conflicts or performance issues.
8. A Powerful Content Management System with Flexibility at Its Core
Joomla’s content system is inherently more flexible and scalable than WordPress. In WordPress, you primarily manage content through posts and pages, while custom post types often require plugins or additional coding.
Joomla treats content differently:
- Articles: Joomla’s articles are highly configurable and can be displayed in a variety of layouts (single article, category blog, featured, etc.).
- Categories: Joomla uses a hierarchical category system, allowing you to organize content more easily across large websites.
- Custom Fields: You can easily add custom fields to your articles, users, and other components without needing additional plugins, providing further flexibility for handling complex content types.
9. Security: Designed with Protection in Mind
Both Joomla and WordPress have strong communities dedicated to maintaining security, but Joomla includes several security features as standard:
- Two-factor authentication (2FA): Available natively to secure your login process.
- Bcrypt encryption for passwords: Ensuring that password security is maintained at a high level.
- Granular user permissions via ACL: Limiting access to sensitive parts of the site or content.
While WordPress security heavily depends on third-party plugins, Joomla's core already includes many of the necessary tools to build a secure website.
10. Community and Development Focus on Best Practices
Joomla’s development community emphasizes best practices, from following modern PHP standards to maintaining a high level of code quality. Joomla’s extensions and core features are regularly updated to reflect advancements in web technology, performance optimization, and security.
Additionally, Joomla has a very active community of developers, users, and contributors. You'll find:
- Joomla Extensions Directory (JED): With thousands of extensions that cover almost every functionality imaginable.
- Joomla forums and user groups: A supportive community that fosters learning and problem-solving.
Advantages of Joomla Over WordPress: A Summary
If you're considering Joomla over WordPress, here’s a quick look at the key benefits Joomla provides:
-
A Modern, Well-Architected System: Joomla is built with modern coding standards (MVC architecture) that make it more scalable, secure, and easier to maintain without requiring the patches or hacks that WordPress often needs for more advanced projects.
-
Template Overrides: Full customization of templates and layouts without the need to modify core files, ensuring that updates are seamless and your site remains future-proof.
-
Menu-First Structure: Joomla’s powerful, flexible menu system gives you complete control over how your content is organized, how users navigate your site, and how URLs are structured. No more struggling with URL customizations or relying on plugins for navigation control.
-
Modular Extensions (Plugins, Modules, Components): Joomla separates its functionality into clearly defined types of extensions (plugins, modules, components) to maintain cleaner, more efficient code. This structure reduces conflicts between extensions and ensures that your site remains fast and reliable.
-
Performance & SEO: Joomla comes with built-in performance and SEO optimization tools, such as search engine-friendly URLs, GZIP compression, metadata management, and caching. You don’t need to install multiple third-party plugins to get your site fast and SEO-friendly - Joomla has you covered out of the box.
-
Advanced Access Control (ACL): Joomla’s robust ACL system offers incredibly granular control over user permissions. This is a major advantage for websites that need fine-tuned access rules for different groups of users - ideal for membership sites, corporate intranets, and large organizations.
-
Native Multilingual Support: Joomla has multilingual capabilities built directly into the core, allowing for seamless management of multiple languages without the need for third-party plugins. WordPress, in contrast, requires separate plugins like WPML, which can slow down your site and complicate the setup.
-
Content Flexibility: Joomla’s content management system is more versatile, with articles, hierarchical categories, and custom fields built into the core. It offers much more flexibility and control than WordPress’s standard post and page types.
-
Security: Joomla’s strong emphasis on security, with built-in features like two-factor authentication, bcrypt password encryption, and granular ACL permissions, means that it is often considered more secure out of the box compared to WordPress, which relies heavily on third-party security plugins.
-
Easy Site Migration: Joomla’s use of relative URLs makes it easier to migrate a site from a development environment to a live server, as it eliminates the need to manually adjust links or paths. WordPress often requires more manual effort in this area, especially when moving from localhost to a live server.
-
Strong Development Community & Best Practices: Joomla’s developer community places a strong emphasis on maintaining best practices in coding and security. The result is a CMS that stays ahead of the curve in terms of features, security updates, and performance enhancements.
-
Built-in Features that Don’t Require Plugins: Joomla comes prepackaged with a number of advanced features like content versioning, access control, custom fields, search-friendly URLs, multilingual support, and contact management - all without needing additional plugins. WordPress requires a variety of third-party plugins to achieve the same functionality.
-
Faster and Easier Large-Scale Development: If you're developing larger, more complex websites or web applications, Joomla's structured approach and built-in capabilities make it a better fit than WordPress. Joomla scales more naturally without relying on extensive customizations and plugins that can slow down a WordPress site as it grows.
-
More Control Over Every Aspect of Your Site: From menu management to content presentation, Joomla offers more granular control at every level. Whether you're a developer who needs to override templates or a site owner who needs to customize metadata and menu layouts, Joomla’s flexibility is unparalleled compared to WordPress’s often simplistic approach.
When Should You Consider Joomla?
While WordPress is an excellent choice for smaller sites, blogs, and straightforward content, Joomla is better suited for projects where scalability, control, and performance are critical. Joomla excels in situations where you need:
- Complex permission structures with multiple user roles (such as membership sites or intranets).
- Multilingual websites with built-in translation management.
- A flexible content architecture for large websites with various content types.
- A need for SEO and performance optimizations without relying on third-party plugins.
- A modular, easily customizable template system.
- Native security and performance features, including 2FA and caching, that require minimal setup.
Some specific scenarios where Joomla might be a better fit than WordPress include:
- Corporate websites or intranets: Where robust user access controls (ACL) and content organization are essential.
- Community platforms or forums: Where user interaction and permissions need to be tightly managed.
- E-commerce websites: Joomla’s component system allows for complex product management, coupled with its performance optimization features.
- Government or educational websites: Where large amounts of content, security, and user control are necessary.
Final Thoughts: Joomla as the Next Step for WordPress Users
Joomla is a modern, powerful, and flexible CMS that offers many features out of the box that WordPress users often rely on plugins to achieve. Whether it's performance, security, SEO, or customization, Joomla allows you to create sophisticated, feature-rich websites without the need for extensive plugins or coding workarounds.
If you’re currently using WordPress but feel limited by its structure, or if you’re frustrated with the constant need for plugin updates and custom hacks, Joomla offers a more robust, flexible alternative. It’s designed for developers and site owners who want more control, scalability, and performance from their CMS.
By switching to Joomla, you’re not just adopting a new CMS - you’re embracing a system that focuses on doing things right, with best practices and future scalability in mind. It might take some time to learn its more structured approach, but the rewards in terms of flexibility, security, and control are well worth the investment.
So, dear WordPress users, welcome to Joomla - a CMS designed for those who want to build better, more secure, and scalable websites. Dive in, and explore a new world of web development possibilities.

WordPress has long reigned as the go-to content management system (CMS) for websites, powering over 40% of the internet as of 2023. However, in 2024, inconveniences began to manifest themselves, which affect its dominant position in the market. Issues surrounding third-party plugin vulnerabilities, compatibility struggles with the Gutenberg editor, the growing complexity of the platform, and disputes with hosting companies like WP Engine have left some users searching for alternative CMS solutions.
Whether you're a small business owner, a developer, or a content creator, it's essential to explore alternatives to WordPress that might better suit your needs in 2024. In this article, we'll examine several leading content management systems (CMS), each offering unique strengths and weaknesses. These platforms include Joomla, Drupal, ClassicPress, and JavaScript-based CMS options like Ghost and Strapi. By the end, you'll have a clear understanding of what's available and which CMS might be the right fit for your next project.
1. Joomla
Joomla is one of the most stable and most well-established alternatives to WordPress. It has built a reputation as a flexible and robust CMS, offering more advanced features out-of-the-box than WordPress. With an active community and a wealth of extensions, Joomla is a powerful platform for developers and users who need more control over their website's design and functionality.
Pros:
- Flexible and Extendable: Joomla offers more complex and customizable layouts than WordPress without relying heavily on plugins. Its extension library includes modules, components, and plugins, offering extensive functionality.
- Multilingual Support: Unlike WordPress, Joomla natively supports multilingual websites, making it ideal for international projects.
- User Management: Joomla has a more advanced user access control system compared to WordPress, allowing for better management of user permissions and groups.
- More Secure: While no CMS is immune to security vulnerabilities, Joomla has fewer third-party dependencies, reducing the potential for plugin-based exploits.
Cons:
- Fewer Themes and Plugins: Joomla's community is smaller than WordPress's, meaning there are fewer pre-built themes and extensions.
- Support and Documentation Joomla's documentation is extensive, but it can be hard to navigate, especially for beginners. Finding solutions in the community forums is not always as easy or as fast as with WordPress, which has a much larger user base.
- Lower Popularity: Due to its smaller market share compared to WordPress, Joomla has less community support, fewer developers specializing in it, and fewer resources like tutorials or guides. This makes it harder to find freelancers or agencies proficient in Joomla compared to WordPress.
Learn more: Joomla!
2. Drupal
Drupal is the choice of many large enterprises, government websites, and educational institutions. Known for its scalability, power, and security, Drupal is a robust CMS for developers who need to build large and complex websites.
Pros:
- Highly Scalable: Drupal can handle vast amounts of content and traffic, making it suitable for enterprise-level projects.
- Security: Drupal is recognized for its top-tier security features, making it a popular choice for high-security websites, such as government and financial services.
- Custom Content Types: Drupal allows for the creation of highly customized content types and taxonomies, which offer greater flexibility in organizing content.
- Developer-Friendly: Drupal's architecture is extremely flexible, and it has strong APIs for custom development.
Cons:
- Complexity: Drupal's powerful features come with a steep learning curve. It is not ideal for beginners or those who want a simple setup.
- Resource-Intensive: Because of its complexity, Drupal requires more server resources, potentially driving up hosting costs.
- Fewer Themes and Plugins: Similar to Joomla, Drupal's ecosystem is smaller than WordPress, meaning there are fewer pre-built solutions for non-developers.
Learn more: Drupal
3. ClassicPress
ClassicPress is essentially a fork of WordPress that keeps the classic, pre-Gutenberg editing experience. It was born out of frustration with the block-based Gutenberg editor that was introduced in WordPress 5.0, and it remains a good choice for those who prefer the old WordPress interface or want a more lightweight CMS.
Pros:
- Familiar Interface: For WordPress users who disliked the shift to Gutenberg, ClassicPress offers a familiar, classic editing experience.
- Lightweight: ClassicPress strips away many of the newer WordPress features, making it a more lightweight and faster platform for simple sites.
- Easy Transition for WordPress Users: ClassicPress is built on the same codebase as WordPress, making it easy for WordPress users to switch over without learning an entirely new system.
- No Gutenberg Bloat: ClassicPress doesn't include the block editor, so it performs better on sites where this feature is unnecessary.
Cons:
- Smaller Community: With WordPress evolving quickly, ClassicPress remains a niche CMS with a small user base and fewer themes and plugins available.
- Limited Long-Term Potential: The future of ClassicPress is somewhat uncertain, as it does not have the same development resources or ecosystem as WordPress.
- Few Advanced Features: Since ClassicPress is focused on simplicity, it lacks some of the more advanced features and updates that WordPress has introduced.
Learn more: ClassicPress
4. Ghost (JavaScript-Based CMS)
Ghost is a JavaScript-based CMS that has gained popularity in recent years, particularly among bloggers and content creators. Built on Node.js, Ghost is designed for speed and simplicity, making it a powerful alternative for those focused on writing and publishing content.
Pros:
- Blazing Fast: Ghost is built on modern web technologies (Node.js), making it much faster than WordPress. It's optimized for performance and load speed.
- Minimalist and User-Friendly: Ghost is incredibly user-friendly, with a clean and minimalistic interface that's easy to navigate for non-technical users.
- Perfect for Content Creators: Ghost is tailored to content creators, especially bloggers, with a focus on writing, SEO, and clean presentation.
- Modern Tech Stack: Ghost uses a JavaScript-based stack, making it easier for developers who prefer modern frameworks like React or Vue to extend functionality.
Cons:
- Limited Plugin Ecosystem: Ghost doesn't have nearly as many plugins or themes as WordPress, which might make customization more challenging.
- Not as Feature-Rich: Ghost is designed to be simple and fast, but this means it's less versatile than other CMS options like Joomla or Drupal for building complex websites.
- Hosting Requirements: Ghost's Node.js foundation requires specific server environments, which can make hosting more complex or expensive compared to PHP-based platforms like WordPress.
Learn more: Ghost
5. Strapi (Headless CMS)
Strapi is a popular headless CMS that's built with JavaScript and designed to work with modern front-end frameworks like React, Vue, or Angular. It separates the back-end content management from the front-end display, allowing developers to have full control over the user experience.
Pros:
- Highly Customizable: Strapi gives developers total freedom to create their front-end using any technology they like, while Strapi handles the back-end content management.
- API-Driven: As a headless CMS, Strapi allows content to be delivered to any platform (website, mobile app, IoT devices) via APIs, making it incredibly versatile.
- Modern Development Stack: Strapi is built using Node.js, making it a good fit for teams using modern JavaScript frameworks and libraries.
- Open Source: Strapi is fully open-source, with a vibrant developer community contributing to its growth.
Cons:
- Requires Development Skills: Strapi is aimed at developers, and non-technical users may find it difficult to set up and manage without assistance.
- No Out-of-the-Box Front-End: As a headless CMS, Strapi doesn't include a front-end interface by default, so users need to build their own front-end, adding to the time and cost of setup.
- Smaller Ecosystem: Although growing rapidly, Strapi still has a smaller ecosystem of plugins and third-party tools compared to older platforms like WordPress or Drupal.
Learn more: Strapi
6. Grav (Flat-File CMS)
Grav is a flat-file CMS that doesn't use a database. Instead, it stores all data in files, making it lightweight and fast. It's perfect for small websites and developers looking for a minimalist, flexible solution.
Pros:
- Fast and Lightweight: Without a database, Grav is extremely fast and requires fewer server resources, making it ideal for small websites or blogs.
- Easy Version Control: Since Grav uses flat files, it integrates well with version control systems like Git, making it ideal for developers.
- Simple Installation: Grav is easy to install and doesn't require setting up a database, reducing complexity for simpler projects.
Cons:
- Limited for Larger Projects: Grav is excellent for smaller sites, but its lack of a database can become a limitation for larger, content-heavy projects.
- Fewer Extensions: Grav has a smaller community and fewer plugins available compared to WordPress, Joomla, or Drupal.
- Requires Technical Knowledge: Grav is more technical than WordPress, making it better suited for developers than non-technical users.
Learn more: Grav
Update (based on user feedback)
7. Backdrop CMS
Backdrop CMS is a lightweight, user-friendly alternative to Drupal, designed specifically for smaller businesses and nonprofits. It shares a lot of the same architecture as Drupal but simplifies the user experience, making it a more accessible choice for those who want the power of Drupal without the complexity. With its focus on usability, affordability, and backward compatibility, Backdrop is a solid choice for those seeking a middle ground between the flexibility of Drupal and the ease of use of WordPress.
Pros:
- Familiar for Drupal Users: Backdrop shares many similarities with Drupal, making it an easy transition for those already familiar with Drupal 7. It’s designed to be a "backward-compatible" version, allowing users to bring over much of their existing work.
- Lightweight and Efficient: Unlike Drupal, Backdrop is streamlined for smaller websites, meaning it requires fewer resources, making it faster and easier to maintain.
- Built-in Features: Backdrop comes with many features that would require add-ons in WordPress, such as advanced content management, layouts, and customizable permissions.
- Affordability: With lower hosting requirements and fewer dependencies on third-party modules, Backdrop can be more cost-effective to run than other CMS options like Drupal.
Cons:
- Smaller Community: Backdrop has a much smaller community compared to both WordPress. This means fewer modules, themes, and less support in terms of forums, documentation, and developer resources.
- Less Customizable than Drupal: While Backdrop simplifies a lot of what Drupal offers, it sacrifices some of the extreme customization and flexibility that Drupal is known for. This may not suit larger, more complex projects.
- Limited Market Share: Backdrop has a relatively small user base. This can make it harder to find developers or agencies familiar with the platform, and fewer tutorials or guides are available.
Learn more: Backdrop CMS
Conclusion
While WordPress continues to dominate the CMS landscape, 2024 offers a growing number of compelling alternatives that cater to different user needs. Whether you're seeking more flexibility, enhanced security, better performance, or simply an easier user experience, platforms like Joomla, Drupal, ClassicPress, Ghost, Strapi, and Grav all present viable options.
- Joomla and Drupal offer robust, scalable solutions for developers and businesses needing extensive control and customization.
- ClassicPress gives WordPress fans a familiar, lightweight option for those who dislike the Gutenberg editor.
- Ghost and Strapi are exciting options for those interested in JavaScript-based CMS platforms, offering speed, modern development stacks, and headless flexibility.
- Grav is ideal for developers who need a fast, flat-file CMS for smaller projects.
- Backdrop is streamlined for smaller websites, meaning it requires fewer resources, making it faster and easier to maintain.
Ultimately, the best CMS for your project will depend on your specific needs, technical skill level, and the scope of your website. Whether you're building a large corporate site, a small blog, or a custom application, the alternatives to WordPress in 2024 offer plenty of opportunities to find the perfect platform. Take the time to evaluate each option's strengths and weaknesses, and you'll be well-equipped to create a website that meets your goals, without the frustrations that WordPress can sometimes bring.

- The first contains demo data in the form of modules (Phoca Particles module) that are independent of any other extension.
- The second contains demo data for an ecommerce project. If you have Phoca Cart installed, you can use this package to quickly install products, categories, etc.


Phoca Premiere demo website

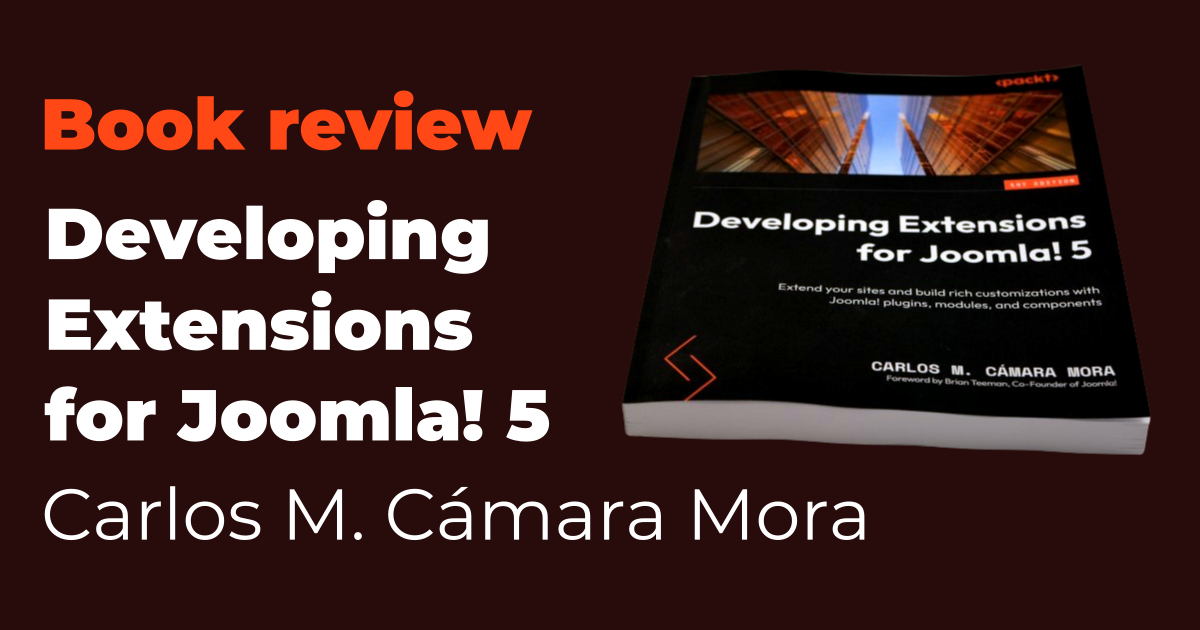
I would like to share with you my findings and brief review of the new book Developing Extensions for Joomla! 5 by Carlos M. Cámara Mora. This will not be a long and competent review, but rather a very brief look at the book. If you are interested in extensive data, such as chapter lists, etc., you can find them on the website for this book: Developing Extensions for Joomla! 5.
First of all, it is worth mentioning that publishing a book in the field of technical literature is not easy in these rapidly changing times, and I would like to express my great admiration for the author.
This book is dedicated to the development of extensions for Joomla! and it is good to realise that a whole major version of the Joomla! system (Joomla! 4) was sacrificed in order to completely modernise the whole system, which brought a lot of negatives for Joomla! 4. It succeeded and we have a new version here - Joomla! 5, which has had this turbulent evolution and brings stability to Joomla!, but most importantly, a modern system.
And that modern system deserves a book. This book will help not only new developers who are not familiar with the Joomla! system, but also experienced developers who will be rewriting their extensions for this modern system.
Personally, I was very pleased with the division of logical units into individual chapters. The big chapter on component development has been split into backend and frontend. And the development of plugins and modules has also been divided into separate chapters. One of the most successful Joomla! libraries has also been given a chapter of its own, namely Forms. The additional chapters on Web Service API and CLI are also important. Everything is rounded off with very important chapters such as Template Overrides and Child Templates. Of course, the book includes a complete guide on how to develop extensions, so there is also a guide on how to distribute extensions, and there are also security practices, which is very important.
Although I haven't read all the chapters yet, I have to say that the book is very easy to read, everything is explained very well and simply. The author gets straight to the point, doesn't distract you unnecessarily and concentrates on the topic at hand.
So what can I say in conclusion? If I had to rate the book, I would give it the highest rating. If I were to recommend the book, I would recommend it to complete newcomers to Joomla! extension development, as well as established developers who need an explanation of the new modern techniques used in Joomla!
But most of all, I would like to thank the author for this book, which only underlines the fact that the Joomla! system, thanks to its modernisation, has once again become an interesting system for developing web applications.
Thank you very much.
Book Website: Developing Extensions for Joomla! 5
- Inkscape - Save As (Save As JPG, Save As WEBP, Save as AVIF, Save As PNG) Extension
- Phoca Cart and YOOtheme PRO Integration: Seamless Ecommerce for Joomla
- Why Your Google Ads Are Not Displayed on Your Website
- Phoca Restaurant Menu: Joomla vs. WordPress - Choosing the Right CMS for Your Restaurant's Needs
- Top 5 Featured Payment Methods for Phoca Cart