Engaging articles, helpful advice, and behind-the-scenes thoughts on web development, CMS platforms, and digital trends.

We often hear from users who feel hesitant or overwhelmed when working with Joomla or its extensions because of the sheer volume of available settings. It is completely understandable to look at a comprehensive configuration panel and assume that setting up a site will be a complicated, time-consuming process.
The truth, however, is that this hurdle does not actually exist.
The "big secret" to mastering Joomla is actually not a secret at all. It is a matter of public record, yet it is something that people frequently do not realize: parameters have default values. The system and its extensions are pre-configured to work straight out of the box. If you do not want to configure anything, you do not have to touch a single setting.
The Phoca Gallery Example
A perfect example of this is Phoca Gallery. This extension is incredibly powerful and features a vast array of parameters. This extensive variability is exactly why it is so popular. It allows administrators to build virtually any style of gallery imaginable.
At the same time, this large list of options can intimidate new users. If you find yourself avoiding the extension because of the settings, there is excellent news: you do not need to open the settings panel at all.
You can create a robust, fully functional gallery in Joomla using Phoca Gallery in under a minute.
The One-Minute Gallery Setup
You can achieve a complete setup, including uploading images to the server, creating albums, and publishing a menu link, without adjusting a single parameter. Here is the exact process:
- Upload your images: Upload your images to the server, organizing them into folders. These folders will automatically represent your individual albums.
- Process the images: Navigate to the Multiple Add view, select your folders, and click Save & Close. Phoca Gallery will automatically create the categories (albums), assign the images to them, and generate all necessary thumbnails.
- Create a menu link: Go to your Joomla menu manager, create a new menu item pointing to the Phoca Gallery, and save.
That is it. In under 60 seconds, you have a complete, professional gallery on your Joomla site.
You do not need to configure anything to get started. The settings are simply there as a toolkit. You do not have to use them, but you always have the freedom to do so when you are ready.
In our previous article, Connecting AI and CMS: Building websites with AI and maintaining it in Joomla CMS, we mostly presented a vision of integrating artificial intelligence with content management systems. Today, we are following up on that vision with exciting news: we now have a complete component available in Alpha version!
Vision:
We have successfully removed two major obstacles that previously hindered the process: the necessity to use Node.js and the restriction of using only a local model.
As a result, Phoca AI can now be used on any Joomla 6 instance. However, before you install Phoca AI, we must emphasize that it is currently in Alpha version and has not yet undergone complete security audits. Therefore, it is highly recommended to test it on a localhost environment.
Alpha version:
How to test?
Install the following extensions:
- Phoca AI component
- Phoca AI template (this package also includes the Phoca Particles module)
and copy demo images (optional) - you can copy the images that serve as demo content when generating websites. Please note: this is not a standard Joomla installation package. It is a regular zip archive that must be extracted and copied directly to the root of your Joomla installation (the package contains a directory tree, meaning the images will be automatically copied to the images/phocaai folder).
You can download all ZIP packages on Phoca AI download website.
It is also important to mention that we are just at the beginning of our journey. Since this is an Alpha version, not all the necessary data is complete yet. Whether we are talking about the list of categories, structures, rules or styles. These will be created and added gradually over time.
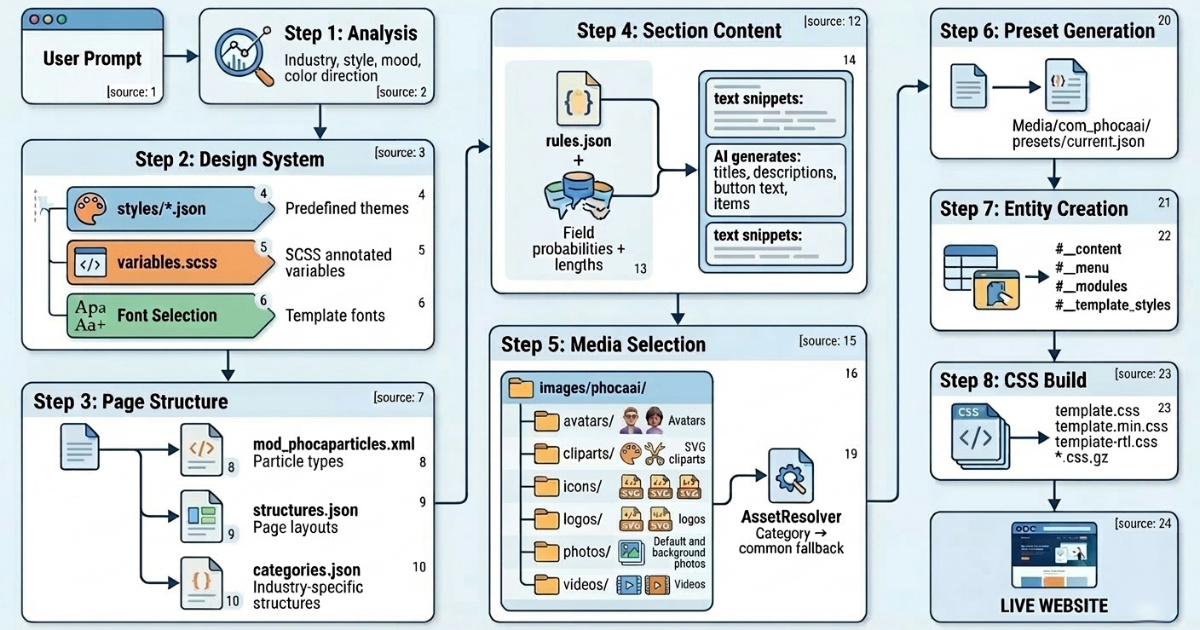
In the following image, you can see how Phoca AI works:
Generating your first page
If you have successfully installed the Phoca AI component, the Phoca AI template, and the Phoca Particles module, go to Options within the Phoca AI component. There, set the path to your local model, or select an external model and enter your API key. Now, navigate to the Generate section, where you can enter a prompt and let the AI create a page for you.
Recommendation: It is always a good practice to start with a clean installation of Joomla. Furthermore, make sure to clear any existing demo data before each new generation.
Once you create a page you like, you can save it as a preset and load it again at any time (in presets view). All the generated content is displayed via standard Joomla modules (specifically the Phoca Particles Module). This means that if you need to make adjustments, you simply go to the module list, find the respective module, and edit it just like you normally would in Joomla.
Join the Testing and Feedback
We are excited to see what you create with Phoca AI. However, please remember that as an Alpha release, your feedback is crucial for us to move toward a stable version.
If you decide to test this component and encounter any bugs, or if you have suggestions for new features and improvements, please let us know. You can post your feedback, bug reports, or questions in the Phoca Forum.
Thank you for being part of this journey and for helping us shape the future of AI in Joomla.

The following article was updated in 2026 and added information about PHP 8.5.
Developers often require the ability to run multiple PHP versions in their development environment. This article provides a step-by-step guide on setting up a LAMP stack (Linux, Apache, MariaDB, PHP) with multiple PHP instances on Ubuntu/Kubuntu 23.10 Linux in the year 2024.
In order to have multiple versions of PHP running simultaneously on Apache, you need the fcgid apache module, which helps us run PHP scripts using FASTCGI. At the same time, it can then run these scripts using different PHP versions. And we do this by creating a virtual host for each PHP version.
Install PHP 7.4, 8.2, 8.3
Prerequisites
Before beginning the installation process, ensure that your Ubuntu/Kubuntu system is up to date by running the following command:
sudo apt updateInstalling Apache
Start by installing Apache version 2:
sudo apt install -y apache2 apache2-utilsCheck if the Apache service is running:
systemctl status apache2
Verify in your browser:

Since we'll be doing development, we'll set the rights and ownership for the server root folder right away (user: jan, group: jan):
sudo chown jan:jan /var/www/ -RInstalling MariaDB
Proceed with the installation of MariaDB:
sudo apt install mariadb-server mariadb-clientAs with Apache, we can check if the service is running:
systemctl status mariadb
Now we will perform the initial setup of MariaDB, mainly setting the password for the root user. Run the following command and follow the questions:
sudo mysql_secure_installationFor example:
Switch to unix_socket authentication? ... Y
Change the root password? ... Y
Remove anonymous users? ... Y
Disallow root login remotely? ... Y
Remove test database and access to it? ... Y
Reload privilege tables now? ... Y
Installing Multiple PHP Versions
And now we will install multiple instances of PHP. There will be two oddities:
1) to avoid conflicting PHP libraries, we will uninstall all the PHP libraries already installed.
sudo apt-get remove 'php*'
sudo apt-get purge 'php*'
2) Add a new specific repository to our system that will allow us to install the latest PHP versions
sudo apt install software-properties-common -y
sudo add-apt-repository ppa:ondrej/php -y
sudo apt update && sudo apt upgrade
After that, let's move on, install the apache module fcgid:
sudo apt install libapache2-mod-fcgidAnd proceed to install PHP versions (along with PHP we list various modules here, go through the list of modules and you can delete the modules that are listed here and you don't need them)
PHP 7.4
sudo apt install php7.4 libapache2-mod-php7.4 php7.4-common php7.4-mysql php7.4-cli php7.4-opcache php7.4-readline php7.4-phpdbg php7.4-fpm php7.4-cgi libphp7.4-embed php7.4-xml php7.4-xmlrpc php7.4-curl php7.4-gd php7.4-dev php7.4-imap php7.4-mbstring php7.4-soap php7.4-zip php7.4-intl php7.4-ssh2 -yOpen and edit following file: /etc/apt/sources.list.d/ondrej-ubuntu-php-mantic.sources
Change string "mantic" to "jammy"
then update the repository information:
sudo apt updateAnd then we can install version 7.4 or 8.3.
So we run the PHP 7.4 installation again (don't run it if everything was fine before).
And let's see an example of another problem, it may be that some library is in conflict, e.g:
The following packages have unmet dependencies: php7.4-intl : Depends on: libicu70 (>= 70.1-1~).
In such cases, you have to search the Internet for a solution and resolve the conflicts separately, in our case for the library: php7.4-intl we resolve them by reinstalling libicu70:
wget http://ftp.osuosl.org/pub/ubuntu/pool/main/i/icu/libicu70_70.1-2_amd64.deb
sudo dpkg -i libicu70_70.1-2_amd64.deb
And now, for the third time, install PHP 7.4 (don't do it if you managed to install it successfully before).
PHP 8.2
sudo apt install php8.2 libapache2-mod-php8.2 php8.2-common php8.2-mysql php8.2-cli php8.2-opcache php8.2-readline php8.2-phpdbg php8.2-fpm php8.2-cgi libphp8.2-embed php8.2-xml php8.2-xmlrpc php8.2-curl php8.2-gd php8.2-dev php8.2-imap php8.2-mbstring php8.2-soap php8.2-zip php8.2-intl php8.2-ssh2 -yPHP 8.3
sudo apt install php8.3 libapache2-mod-php8.3 php8.3-common php8.3-mysql php8.3-cli php8.3-opcache php8.3-readline php8.3-phpdbg php8.3-fpm php8.3-cgi libphp8.3-embed php8.3-xml php8.3-xmlrpc php8.3-curl php8.3-gd php8.3-dev php8.3-imap php8.3-mbstring php8.3-soap php8.3-zip php8.3-intl php8.3-ssh2 -yPHP 8.5
sudo apt install php8.5 libapache2-mod-php8.5 php8.5-common php8.5-mysql php8.5-cli php8.5-readline php8.5-phpdbg php8.5-fpm php8.5-cgi libphp8.5-embed php8.5-xml php8.5-xmlrpc php8.5-curl php8.5-gd php8.5-dev php8.5-imap php8.5-mbstring php8.5-soap php8.5-zip php8.5-intl php8.5-ssh2 -yphp8.5-opcache instruction was removed for PHP 8.5 because it is now included in core.
We can check if all PHP instances are installed:
ls -la /var/run/php/The fpm service takes care of running all PHP instances. Before we start it or check its status, let's modify the user so that PHP scripts have the ownership and rights of the same user who creates folders on the server and uploads files to them.
Open and edit the following files, replace all occurrences of "www-data" in these files with the user (and group) name, in our case it is "jan":
/etc/php/7.4/fpm/pool.d/www.conf
/etc/php/8.2/fpm/pool.d/www.conf
/etc/php/8.3/fpm/pool.d/www.conf
Now start the fpm services (restart them if they are running):
sudo systemctl restart php7.4-fpm
sudo systemctl restart php8.2-fpm
sudo systemctl restart php8.3-fpm
By running the following command we can check the status of the service (e.g. for PHP 8.3)
sudo systemctl status php8.3-fpm
Let's enable some necessary apache modules:
sudo a2enmod actions fcgid alias proxy_fcgi rewriteRestart Apache:
sudo systemctl restart apache2Create Virtual Hosts
Now we will create virtual hosts, for all PHP versions we will create our own file in the folder:
/etc/apache2/sites-available/
we create the following files:
site74.test.conf
site82.test.conf
site83.test.conf
Each of them will contain the following instructions (PHP 8.3 example):
<VirtualHost *:80>
    ServerAdmin Site
    ServerName  site83.test
    ServerAlias www.site83.test
    DocumentRoot /var/www/site83.test
    <Directory /var/www/site83.test/>
            Options FollowSymLinks MultiViews
            AllowOverride All
            Order allow,deny
            allow from all
            Require all granted
    </Directory>
    <FilesMatch \.php>
        SetHandler "proxy:unix:/var/run/php/php8.3-fpm.sock|fcgi://localhost/"
    </FilesMatch>
</VirtualHost>
Once we have these files created and saved, then we enable all the pages:
sudo a2ensite site74.test.conf
sudo a2ensite site82.test.conf
sudo a2ensite site83.test.conf
And reload apache:
sudo systemctl reload apache2To make sure that our system knows the names of our test pages, we will modify
/etc/hosts
and add this line:
127.0.0.1 localhost site74.test site82.test site83.testIn /var/www/ folder
create the following subfolders for our test domains:
mkdir /var/www/site74.test
mkdir /var/www/site82.test
mkdir /var/www/site83.test
We create them without sudo, using a user that also runs PHP scripts, in our case jan and insert a PHP file index.php into each of them, which will contain:
<?php
echo phpinfo();
?>
Every time we make a change to the settings (e.g. php.ini, etc.) we restart both apache and fpm
sudo systemctl restart php8.3-fpm
sudo systemctl restart apache2
Then enter the following URLs into the address bar one by one:
site74.test

site82.test

site83.test

Conclusion
By following these steps, you can successfully set up a LAMP stack with multiple PHP instances on Ubuntu/Kubuntu 23.10 Linux in 2024. This configuration allows developers to work on different PHP versions simultaneously for their development needs.


It is true that a modern one-page website can be generated in seconds using AI or static site generators. While this speed is impressive, we have chosen to use a Content Management System (CMS) for this project for critical reasons like future management and scalability.
In our latest video tutorial (embedded below), we demonstrate how to build a fully functional One-Page Website using Joomla CMS. We take a very simple and efficient approach: rather than complex coding, we build the entire structure using Joomla modules. This allows us to take a client’s raw text and turn it into a clean, easily editable website in just a few minutes.
The Problem with Static HTML
Last time, we explored how AI can generate websites instantly. But relying on static HTML brings significant challenges the moment a project is handed over to a client.
Static HTML is rigid. Updating content, adding new languages, or expanding a one-page site into a multi-page web application requires manual coding. If a client wants to change a paragraph or swap an image, they cannot do it without technical knowledge. As requirements grow, perhaps adding eCommerce or advanced user features, a static site faces limitations in its flexibility and capability.
Why Choose a CMS?
By choosing a Content Management System (CMS) over static files, we prioritize the future of the website. A CMS handles the heavy lifting, allowing for:
- Easy editing and management in the future
- Simple content updates for clients or non-technical users
- Easy redesign and layout changes
- Scalable and extendable with new features
- Built-in tools for SEO, caching, security, and user management
- Supports multilingual content out of the box
- Reduces dependency on developers for everyday updates
- Website can grow from one-page to full web application
Why Joomla?
For this project, we chose Joomla because it offers a perfect balance of power and flexibility. Unlike some platforms that rely heavily on bloated plugins, Joomla is a robust system built on modern code architecture.
Key advantages of using Joomla for this build include:
- A real system built on modern code architecture
- Template overrides: Customization without breaking the core
- Menu architecture with full control over navigation and links
- Modular extensions: Plugins, modules and components
- Performance, SEO, and Accessibility: Optimized out of the box
- Advanced access control levels (ACL)
- Multilingual Support: Native and simple
- A powerful system with flexibility at its core
- Security: Designed with protection in mind
- Community and development focus on best practices
What We Build in the Video
In the tutorial below, we guide you through the complete process step-by-step.
Since this is a one-page website, we take a slightly different approach than the standard "article-based" structure. Instead, we utilize modules to build distinct rows and containers.
To achieve a lightweight and responsive design, we utilize:
- Phoca Spectrum Template: A clean template that uses standard Joomla settings and Bootstrap classes without heavy frameworks, and allows us to easily add containers (rows) and columns.
- Phoca Particles Module: A tool designed specifically to create structured content blocks (like services, team members, and features) easily.
- Phoca Maps: For integrating a privacy-friendly map in the contact section.
We walk through setting up the Home banner with animations, an About Us section, Team profiles, References, and a Contact form. Finally, we demonstrate the power of Joomla's customization by using user.css to globally change the color scheme in seconds, proving that you can have a custom design with the stability of a CMS.
- Connecting AI and CMS: Building Websites with AI and Maintaining It in Joomla CMS
- 5 Extensions to Boost Your Joomla 6 Administration Workflow
- Joomla - Feedback and Ideas For Improving The Work in the Administration In Future Versions For a More Efficient Experience
- Inkscape - Place Text Behind Object
- Inkscape - Remove Image Background (AI) Extension